Building a Mixer
The Boat
The area where I live is essentially a swamp. Aside from the big bodies of water, like the Chesapeake Bay and the Atlantic Ocean, there are hundreds of smaller lakes, creeks, ditches, and canals that are inaccessible by larger boat. Having gotten a taste of these gems-within-the-surburban-jungle before in a canoe, I figured that a small rowboat/sailboat would be just the ticket for further exploration.
Now, a sailboat and a rowboat have opposing requirements. Rowboats tend to be narrow to reduce wetted surface. Unballasted sailboats need beam to counteract the force of the sails. So a boat that is made for both rowing and sailing is normally considered to be good at neither. But that doesn't stop designers from trying and customers from buying.
Enter Jim Michalak (pronounced like metallic only replace the "t" with a "k" sound). As an amateur boatbuilder and designer who hasn't quit his day job, Mr. Michalak has the disease of an engineer--always tinkering. In amongst his rowboats, sailboats, powerboats, and many combinations is the Mixer.
Here are the specifications.
What attracted me to the Mixer was:
- Short length - which translates to light and easy to carry,
- Large cockpit - can carry 2 people in more comfort than my Sunfish,
- Floatation chambers - essential in my view,
- Fixed Leeboard - leaves cockpit uncluttered, and
- Balanced Lug Rig - intriguing sail that keeps the spars short.
Now, after spending over 2½ years putting together Egia, constructing a 12 ft. dinghy would be just too easy. Or would it? Originally intending to build 2 different boats at once, I deferred to just working on one. Good thing, since putting together the Mixer has taken over 1 year.
The construction details of the Mixer will not be as detailed as my log of Egia. There are so many other resources on building these smaller craft that I felt I'd just be repeating what others have already written. And most are written better than my meager talent can produce. So I'll just give a brief chronicle of activity and talk about my numerous changes that make a mockery of the designer's hard work. Oh, and maybe a few pictures, too.
Construction I
Start to March 2002
Simply put, the Mixer is a 2-chine ply design with a plumb bow and stern that makes construction uncomplicated. The whole thing can be done with 4 sheets of 1/4" plywood. But since I had some scraps left over from Egia, the bulkheads were cut from 3/8" ply and the transom was made from 1/2" ply.
Assembly went pretty well. But there were a few head-scratching moments. The first was over the bilge panels. The designer gives the dimensions for the bottom panel and the sides but not the bilges. So I was forced (like any builder) to stitch and glue the sides and bottom, then carefully measure the remaining section. Carefully measure...yeah, right! I just held a sheet of plywood against the boat and ran a pencil line where I needed to cut. Awkward? Yes. Accurate? No. But I'm not building a Concordia Yawl here.
Next head-scratching moment: what to do about the copper wire stitching. Since I did all the twists on the outer part of the hull, that really hampered my idea of taping the outer chines first. I wound up putting an epoxy fillet on the inner part of the chine, then snipping off the wires on the outside. The fillet held the panels together well enough to get the tape glued in place. Then I could breathe a bit better.
Third head-scratching moment: how to leave the forms in when I fiberglass the outside of the hull. There are 2 temporary forms that help define the shape of the hull along with the built-in bulkheads. These forms are screwed in place and then removed after the gunwales are installed. I wanted to fiberglass before installing the gunwales, so that left me with taking out the forms. Somehow they'll have to be back in place when I glue on the gunwale.
April 2002 - October 2002
It's fair to say that building boats is best left as a winter pursuit. Other outdoor activities always seem to eclipse that project in the garage. But I've still plugged away here and there so progress is not totally inconsequential. Completed are installing the gunwales, fiberglassing the hull, installing and fiberglassing the decks (gosh, this is so easy and quick!). Still left are fiberglassing the cockpit, making the sailing rig, and then painting the whole mess.
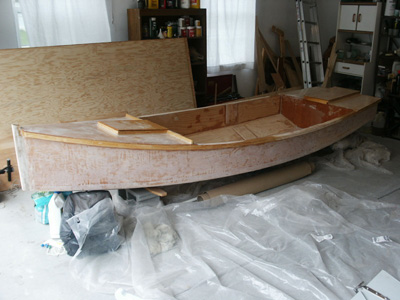
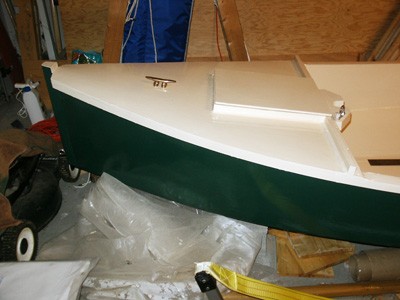
Here's the most recent shot of the whole boat as it rests in the garage. Distortion of the camera lens makes the stem look angled; it is actually vertical. So is the transom.
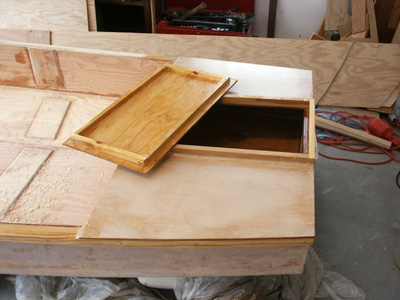
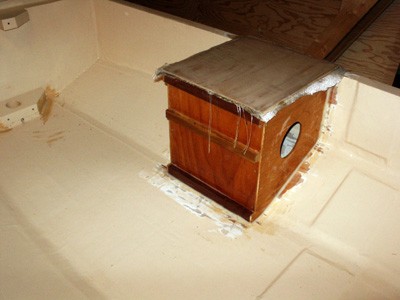
A closer shot of the hatch detail. The two hatches will be secured by line similar to kayak hatches. Some rubber gasket material around the edges will ensure some degree of water resistance. Also visible here are the butt blocks for each of the hull.
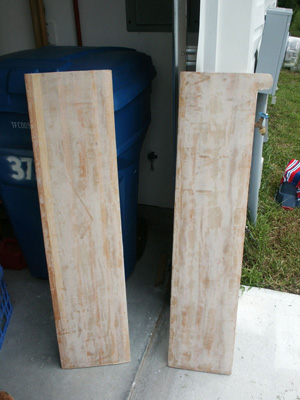
What you're looking at here are 2 plugs. The plug on the right will become the leeboard for the Mixer; the one on the left will be for...well, I don't know at this point. Instead of being built of several layers of plywood as described in the plans, I decided to laminate them with alternate poplar and pine strips. They were then planed and sanded to somewhat of a foil shape and then coated with 6 oz. fiberglass. A little additional sanding and that's what they look like.
I've done plywood laminating before, like for Egia's rudder, so I thought I'd try something new. Besides, I think these boards are stronger than a ply laminate.
Now I'm plugging through the various pieces needed for the sail rig. Mast partners, leeboard attachments, and so forth. Pretty soon I'll be ready to start making the mast and booms themselves.
November 2002 - February 2003
It's fair to say that building boats is best left as a summer pursuit. Well, when doing finishing work anyway. I'm to the point where I'm waiting impatiently for a daytime temperature over 50 degrees so I can prime, paint, and varnish. At press time the mast and spars are done and varnished, plus there are 2 coats of paint on the hull.
March 2003 - Stop the Presses!
Okay, so I'm finished with the painting, just a few more things to varnish. I've started putting some of the hardware on. The most significant was the leeboard. I attached it with the pivot bolt, and then stepped back to take a look at it. Like a proud father inspecting his newborn, I looked at it from this angle, from that angle, wiggled it a little, moved it up and down a little.
The more I looked at that leeboard, the more uneasy I became. The more uneasy I became, the more I fretted. And the more I fretted, the more I looked at that leeboard again to begin the cycle anew.
For months I've been thinking about that leeboard. There's no doubt that the idea is a good one. It is fixed so that it will work on either tack unlike traditional leeboards. But I've always had a nagging voice wonder about the strength of the gunwale and whether it would stand up to the torque the leeboard will exact upon it. There was no doubt that the gunwale would bend, since there is no structure in the cockpit to prevent it. Michalak specified a thicker gunwale, probably to offset this bending force. But how much bend was too much? I wouldn't find out until I took it out in a blow.
My next nagging voice was over capsize. The leeboard is installed on the starboard side. What if I capsized to port and fell out of the boat in the process? Righting the boat would depend on getting to the leeboard, which would now be 3 ft. above the water. Could I reach it while treading water? If I could, would it withstand 170 lbs. of man gristle hanging on the end? Then we're back to the gunwale bending again. Ach, Himmel!
Now that I'd installed the leeboard, the nagging voices had turned into the chorus of an angry mob. The issue now? When retracted, the leeboard hovers away from the hull, especially the aftermost end. It is unprotected from coming along side another boat, unprotected from waves, and unprotected from capsizing to starboard on a beach landing. All of these scenarios could have catastrophic effects on the leeboard, the attachment points, the gunwale, or all of the above. Hence the deafening mental cacophony.
Right. Now it was prime time to make a mockery of the designer's hard work as mentioned on the previous page. Scrap the leeboard! Build a daggerboard trunk! Lengthen the building process another 3 months! Shiver me timbers.
Construction II
Stop the Presses! to June 2003
After the decision was made to modify the Mixer design to include a daggerboard trunk instead of the original leeboard, I had to get to work to decide how to do it. I didn't want to put it in the center because it would destroy the open cockpit as well as hamper the rowing capability (where would I put the rowing seat?). So I took some of my inspiration* from Bolger's Windsprint which has a trunk attached to the inside of the side panel. I thought if I placed the trunk on the bottom chine, it would not interfere too much with the open cockpit. It was a similar concept to Egia's off-centerboard. Since I may want to sleep aboard, I laid down in the cockpit just to make sure it was okay.
As for the daggerboard, I decided to use the spare plug I made instead of the leeboard. That gave me the dimensions of the trunk. So I began.
The hardest part of this endeavor was getting the trunk parallel to the centerline. It's close, but not exactly parallel. Next hardest was getting the trunk perpendicular to the bottom. It's close, but not exactly plumb. But it will do. Besides, the whole boat isn't perfect, why should I be starting now?
Here's a view of the trunk "box", showing the top just fiberglassed with 10 oz. cloth I had left over from Egia. I won't put any fiberglass anywhere else, just coat it liberally with epoxy. The hole is for a Beckson inspection port so I can close it up and keep it watertight. It'll be a nice place to put a bottle of water, lunch, or whatever.
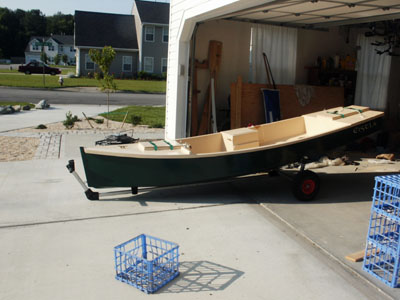
Emerging from the graving dock! Fully painted and ready for a trial of all the rigging gear. Up to this point I don't even know if the mast will fit in the partners.
Outside. Here's a good shot of quite a few things. The rudder is all assembled with oversized pintles and gudgeons, the hatches have weather stripping and straps in place. The daggerboard "box" looks a little more like part of the boat. And yes, the hiking stick is really long. The better to steer from everywhere, my dear.

Here we are fully rigged. The mast does fit! The bench seat is also in place. I'm glad I went through this exercise in my side yard instead of at a dock, because there's a few things I discovered. The original plan I had for attaching the halyard to the upper spar didn't work so I had to redo that.
The spars rub against the mast and damage the varnish (I figured the varnish would be more resilient). So I'll have to put leathers on the booms to prevent that. The main sheet is the perfect length, but I had reversed the blocks on the traveller and the boom so those need to be switched. And hoisting the sail a few times taught me the dangers of the upper spar swinging around until it is raised up all the way. And yes, you don't need to remind me that the hiking stick is trapped beneath the traveller and will be useless if rigged this way.
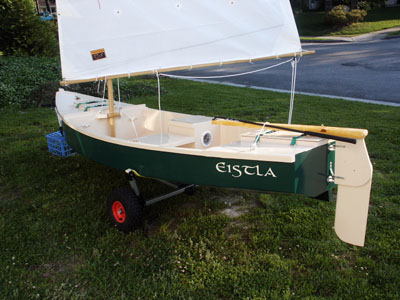
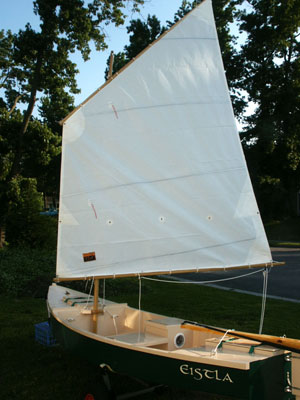
And here is it in all its glory.
Next stop, the water! When that happens, I will need to mark the oars for where the "leathers" go. I say "leathers" because the kind I bought aren't leather, more like a hard rubber material. Can you say "cheapskate?" I knew you could.
* Now we all know that there is no such thing as a completely original idea, there's only adaptation of existing ideas into something slightly different. This doesn't only apply to boat design, but also music, art, merchandizing...
Launch
...or How Ignominy Breeds Humility
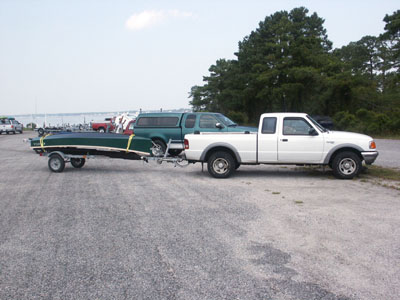
June 29, 2003. The day has arrived. I begin by putting the boat on the trailer. Upside-down is best, so it takes me a bit to figure it out. Of course, it'd only take 15 seconds with another pair of hands, but none are available. Then it's a nice drive to the carefully picked launching ramp at First Landing State Park. This area is surrounded on all sides by land and has heavy boating traffic on the weekends. In case I run into trouble, it wouldn't be much of a swim.
So I arrived at the parking lot. First order of business is to get the boat off the trailer and onto the nifty Seitech dolly. Paint and asphalt don't play well, so after a few scratches on the gunwale, the boat was now upright on the dolly. Then I noticed that the trailer bunks rubbed off some paint near the stern and bow. Arrggh!
After rigging the sail and rudder, it was time to dunk. While rolling down the ramp I said a quiet "May this boat be blessed and all that sail in her." Then, Eistla was floating.
Next order of business, raise the sail and get underway. Winds were very light to non-existent, and lots of traffic made for lots of wakes. I tried a new technique with the halyard attachment, but found when the sail was raised that the upper spar did not rest on the mast where I had put chafing gear. The result could only mean more scratches and varnish worn off. Double Arrgghh!
The ramps were busy, so I tried to get away as quickly as possible. After lowering the rudder I cast off the painter so I'd drift away from the dock while I finished rigging. The area around the dock was shallow, so I figured that I could put the daggerboard down a little until I was in deeper water. So I proceeded to put the daggerboard into the trunk.
I tried again to put the daggerboard into the trunk.
And I tried again.
I had installed strips of carpet on the fore and aft part of the trunk to prevent the board from banging around. Now it made the gap too tight and board wouldn't go in. Triple Arrgghh!
I immediately went into modification mode and started pulling off the aft carpet strip. It was glued on; it came off reluctantly for the first few inches, and then it was too hard to grip the stuff in the tiny space. So then I started jamming the board into the trunk to help peel away the carpet, with limited success. I still needed to attack it from the bottom.
About this time, Providence struck up with a very light wind that carried me around the corner from the ramp to a nice beach. I hauled the boat up the beach and tipped it on its side to start pulling the carpet from the other side. Seemed to work, most of the carpet fabric was soon removed. The daggerboard now fit.
With Eistla upright and back in the water, I tried sailing again. The wind was still too light and fluky for my tastes, but a few puffs did make us move. Eventually it became just too frustrating, so I thought it was time to try out my rowing configuration. This involves striking the sail and mast, tying them athwartships, then breaking out the oars.
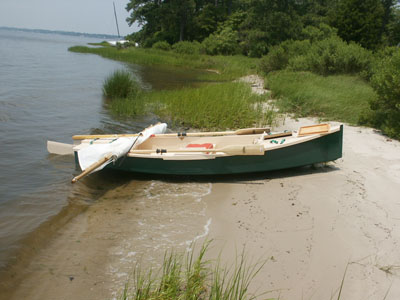
I then rowed myself to another patch of beach where I took these 2 pictures. The sailboat down the beach is indeed high and dry, a victim of a recent storm.
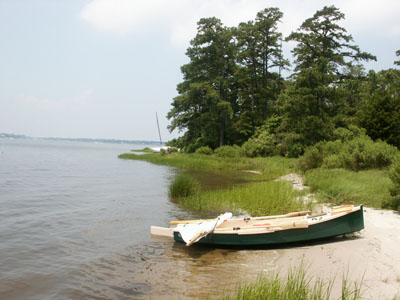
The closer pic shows the rig lashed to the after deck. I found that this interfered a bit with rowing, so I eventually moved it to the forward end of the cockpit. The spars are then slightly higher off the water and they don't get hit by the oars.
Trying to make this experience end as soon as possible, I started back to the ramp. I noticed as I rowed that since the oarlocks are on the inside of the gunwale, the oars rub the outside of the gunwale, scraping off paint and leaving black smudges from the rubber buttons. Quadruple Arrgghh! One last observation: the cleat for the mainsheet is in a bad spot and could cut a leg open. Quintuple Arrgghh!
So. Despite all these calamities, there were a few bright spots. Rowing Eistla is fairly easy. The oar length feels about right and they fit easily in the cockpit. She's fairly stable. All my wrestling and stomping around with the daggerboard was done while standing up and I never felt in danger of swimming. Definitely more stable than a Sunfish. The one puff we got made Eistla accelerate and start chortling water, so she's not underrigged. Other attributes will need to be discovered another time. For this adventure, the boat and I survived, and that's the important thing.
Back to the shop. Modifications are in order. Halyard, oarlocks, mainsheet cleat, daggerboard trunk, varnish, and paint. Capsize tests are also needed to determine how much water I'll have to bail. Have I left anything out?
Postpartum
Setting things right
Before my next trip, I had changed the oar locks to the outside of the gunwale, replaced the mainsheet cleat with a cam cleat mounted on top of the daggerboard box, and repaired the various scratches. I reset the halyard so the upper yard would rest against the mast in the right spot. Several short sails and rowing trips have been successful. I have improved my technique of getting the boat on and off the trailer so I don't ding it up.
Recycled building materials and a Tale of the Scale
One of the fun things about building Eistla was the amount of the materials that were scavenged. The bulkheads were thicker plywood left over from building Egia. Some parts were pilfered from a church railing bought for $5 by my wife, and an old hardwood bed frame once used by my son was chopped up for various things. I probably didn't save much money doing this, but it was a noble challenge.
I bought a cheap scale so I could compare the designer's guess at weight and my finished product. There's no doubt that I expected Eistla to be overweight. I fiberglassed every exterior surface, added a stringer on the bottom, added the daggerboard box, and installed oversized bulkheads, so there was no doubt I fattened it up a bit. The question was how much. Michalak estimated an empty weight of 90 lbs. and his designed waterline was at 385 lbs. Empty, Eistla weighs 153 lbs. Together with the complete sailing rig, it tops out at 191 lbs. When I get in, I'm still about 25 lbs. short of the waterline. Twice I've loaded the boat to about 450 lbs. displacement, and Eistla did not behave sluggishly or overloaded, just a bit wetter.
The Ultimate Test
A 38 nm camp cruise through the unmarked backwaters of North Carolina and Virgina. That would be a good test of Eistla as a dinghy cruiser. Loaded with camping gear and 2 days worth of food, water, and clothing, I set off. I made it all of 200 yards before ordering a hasty retreat. The reason: beating into a 20 - 25 kn breeze for 38 miles was not my idea of prudence. Banging through a steep chop was pretty wet and the sail, even reefed, was too much for the conditions. Had the wind been from a more reasonable direction we would have been successful, maybe.
After that embarrassment I returned the sail to the sailmaker for another reef point. I also purchased 7 ft. oars to get a bit more purchase for each stroke. They even fit in the cockpit if you angle them a bit. I have since gone on a number of sailing and rowing trips, including one 24 nm passage through the Intercoastal Waterway along Eastern Shore, Virginia. I took all my camping gear in preparation to stay overnight, but the trip was a charmed one as it was completed in one day.
Rowing Eistla has been a good learning experience. Due to the amount of rocker it doesn't track very well, even with my addition of a full length skeg. But once the rudder is deployed, then it tracks a thousand times better. A small bungee cord to keep the tiller centered is also a welcome help while rowing. If you need to turn, you can steer temporarily with one foot.